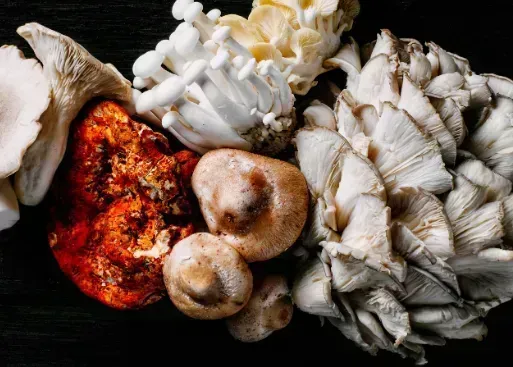
Lion’s Mane mushroom (Hericium erinaceus) is the most popular functional mushroom, known for its distinctive, shaggy appearance and potential cognitive benefits. Growing these mushrooms offers a way to enjoy fresh, gourmet produce as it's difficult to find in stores. In this guide, we’ll cover two effective cultivation methods: the bag method, which is perfect for those seeking quicker results and more control over their growing environment, and the log method, ideal for a more natural approach that can yield mushrooms over several years. Whether you’re an indoor grower or prefer outdoor projects, you’ll find the right method to suit your needs.
In this Review:
Choosing Growing Method: Log vs Bag
How to Grow Lion's Mane in Bag
How to Grow Lion's Mane on Log
Dive Deeper into Mushroom Cultivation
What is Lion’s Mane Mushroom, and Are They Easy to Grow?
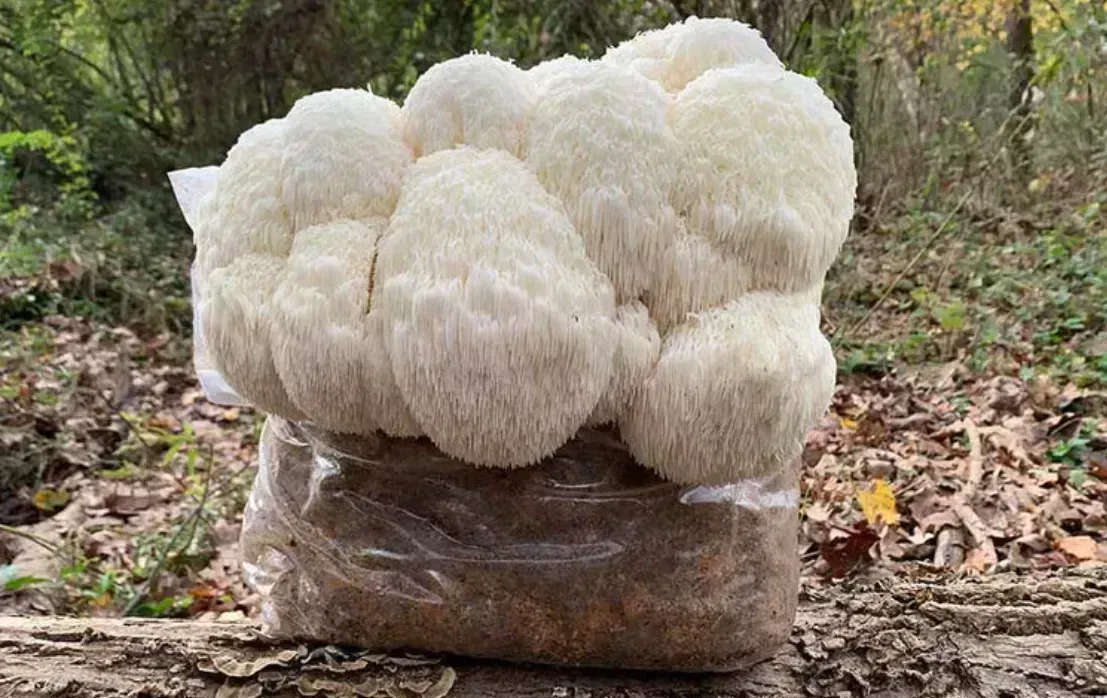
Lion’s Mane mushrooms are named for their unique, cascading, white spines that resemble a lion’s mane. They are native to temperate forests and typically grow on hardwood trees like oak, beech, and maple. Beyond their striking appearance, Lion’s Mane mushrooms have gained attention for their potential health benefits, especially in supporting cognitive function and nerve health, thanks to bioactive compounds like hericenones and erinacines.
Is Lion's Mane Easy to Grow?
Lion’s Mane mushrooms can be relatively easy to grow if you provide the right conditions. They require consistent moisture, proper air circulation, and a stable temperature to thrive. Unlike some other gourmet mushrooms, Lion’s Mane is adaptable to different growing methods, making it accessible to beginners and experienced growers alike. While the bag method allows for a faster and more controlled indoor growing experience, the log method offers a more traditional, outdoor setup that can produce mushrooms over multiple years. With the right guidance and patience, both methods can yield a successful harvest.
Lion's Mane Mushroom Growth Stages:
- Spawning Stage: 1-2 weeks
- Colonization Stage: 2-4 weeks (Longer for logs)
- Pinning Stage: 1 week
- Fruiting Stage: 1-2 weeks
- Harvest Stage: Ready when spines are well-developed but still white
Choosing Your Growing Method: Log vs. Bag
Before starting your cultivation journey, it’s important to decide which growing method best suits your space, time, and preferences. Here’s a brief comparison of the two main methods:
- Growing in Bags:
- Best for: Indoor growers with limited space who want a faster yield.
- Pros: Provides a controlled environment, faster growth cycle, and the ability to grow year-round.
- Cons: Requires more initial setup, such as preparing substrates and maintaining high humidity levels. (Unless you buy a premade grow bag)
- Ideal for: Those who want to see results within a few months and can create a stable growing environment indoors.
- Growing on Logs:
- Best for: Outdoor enthusiasts who have the space and patience for a longer-term project.
- Pros: Simulates a natural environment, with the potential for mushrooms to grow for 3-5 years from a single inoculation.
- Cons: Takes longer for the first flush (6-18 months) and requires space outdoors.
- Ideal for: Those who want a low-maintenance setup that can produce mushrooms for multiple seasons.
Choosing the right method depends on your growing environment and how quickly you want to see results. Read on to learn the step-by-step processes for both methods, and discover which approach is best for you.
Growing Lion’s Mane Mushrooms in a Bag: A Step-by-Step Guide
Lion’s Mane mushrooms (Hericium erinaceus) are not only prized for their unique appearance and delicious, seafood-like flavor but are also known for their potential cognitive benefits. This guide will take you through the entire process of growing Lion’s Mane mushrooms using the bag method, from setting up your supplies to harvesting your first flush of mushrooms.
1. Preparing Mushroom Supplies and Growing Space
Before you start growing, it’s crucial to gather all the necessary materials and set up your growing space. Here’s what you need:
- Reccomended Pre-made Mushroom Grow Blocks: These are pre-inoculated and colonized, ready to fruit. Check out North Spore's ready to use grow bags and kits.
- Substrate Options (The base for your spawn to grow in)
- Sawdust: Popular for its nutrients and moisture retention.
- Straw: A cost-effective option but less nutrient-dense.
- Mushroom Grow Bags: Specially designed bags with built-in filter patches, allowing air exchange while keeping out contaminants. Other appropriate bags could work to.
- Lion’s Mane Grain Spawn: The “seed” that will grow into mushrooms. Purchase from a trusted supplier like North Spore here.
Setting Up Your Growing Space:
- Clean Environment: Choose a clean, dust-free space with stable temperatures between 65-75°F (18-24°C). This could be a spare room or a closet.
- Humidity Control: High humidity (85-95%) is essential for mushroom growth, so consider using a humidifier or misting the area regularly.
Tip: For those new to mushroom growing, pre-made grow blocks are an easy way to start, reducing the need for complicated setup.
If you plan to buy a pre-made grow block skip to step 7. Helping Your Home-Grown Lion’s Mane Fruit
2. Preparing the Substrate
The substrate is the food source for your Lion’s Mane mushrooms. Preparing it correctly is crucial for a successful grow.
Using Sawdust as a Substrate:
- Mixing the Substrate: Use hardwood sawdust (like oak or beech). Mix it with water until it reaches about 60% moisture. A simple way to check is the “squeeze test”—squeeze the sawdust in your hand. It should hold together but not drip.
Using Straw as a Substrate:
- Chop and Soak the Straw: Cut the straw into 2-4 inch pieces and soak it in warm water for 12-24 hours to fully hydrate.
- Pasteurize the Straw: Heat the soaked straw in water at 160-180°F (71-82°C) for 1 hour. This helps kill off harmful microbes without sterilizing beneficial ones.
Using Pre-made Mushroom Grow Block:
- Comes fully colonized: If you plan to buy a premade lion's mane grow block, its already colonized so you can skip right onto step 7!
Tip: Pasteurization for straw substrates is less intensive than sterilization, helping keep beneficial microbes that can outcompete contaminants.
3. Sterilizing the Substrate Mix
Sterilization is essential for sawdust-based substrates, as it ensures that no unwanted bacteria or molds outcompete your Lion’s Mane.
- Using a Pressure Cooker:
- Pack the sawdust substrate into mushroom grow bags, leaving a bit of space at the top.
- Place the bags in a pressure cooker and cook at 15 PSI for 90-120 minutes. This ensures that all harmful organisms are killed.
- Let It Cool: After sterilizing, let the bags cool completely before opening. If the substrate is too warm when you add the spawn, it could kill the mycelium.
Common Mistake: Opening the sterilized bag while it's still warm can cause contaminants to be drawn in. Always wait for it to cool to room temperature before proceeding.
4. Inoculating the Substrate Mix for Growing Lion’s Mane
Inoculation is the process of adding grain spawn to the cooled substrate, which allows the mycelium (the vegetative part of the mushroom) to grow and spread.
- Clean Workspace: Make sure you’re working in a clean area. Wipe down surfaces with alcohol and wash your hands thoroughly.
- Mixing the Spawn: Open the cooled grow bag and add 1-2 cups of Lion’s Mane grain spawn. Mix it evenly throughout the substrate using sanitized hands or utensils.
- Seal the Bag: Once mixed, fold the top of the bag and seal it using a heat sealer or secure it with a zip tie. Make sure the filter patch remains exposed for proper air exchange.
Tip: Even mixing of the grain spawn ensures that mycelium spreads throughout the substrate evenly, leading to faster colonization.
5. Incubating Lion’s Mane
Incubation is the phase where the mycelium spreads throughout the substrate, creating a solid mass that will eventually produce mushrooms.
- Store in the Dark: Place the inoculated bags in a dark, warm area with temperatures between 65-75°F (18-24°C). Light is not necessary at this stage.
- Watch for White Growth: Over the next 2-4 weeks, you’ll see white, thread-like mycelium spreading through the substrate.
- Check for Contaminants: If you notice any spots of green, black, or blue, this indicates mold. Remove any contaminated bags to protect the healthy ones.
Fun Fact: The term "colonization" comes from how mycelium "colonizes" the substrate, turning it into a nutrient-rich environment for future mushroom growth.
6. How to Tell if Fully Colonized
Knowing when your substrate is fully colonized is essential before moving on to fruiting. Here’s what to look for:
- Uniform White Coverage: The entire substrate should be covered in thick, white mycelium. Any visible substrate should be fully enveloped.
- Firm Block: Press gently on the bag—it should feel solid and dense due to the mycelium network.
- No Unusual Smells: A healthy colonized bag smells earthy. A sour or musty odor means contamination, and the bag should be discarded.
Tip: Patience is key here. Rushing the process can stress the mycelium, leading to poor mushroom growth.
7. Helping Your Home-Grown Lion’s Mane to Fruit
Once your substrate is fully colonized, it’s time to transition to fruiting conditions to encourage mushrooms to grow. (If you bought a pre-made grow block it is already fully colonized so start here)
- Set Up a Fruiting Chamber: A simple fruiting chamber can be made using a clear plastic tote with holes drilled in the sides for airflow. Line the bottom with wet perlite or a damp towel to maintain humidity.
- OR Use a Monotub For Better Results: Not everyone is able to create a controlled mushroom laboratory, but you can still create ideal conditions for growing mushrooms if you get a monotub which controls the humidity, airflow, and temperature. For a reliable and user-friendly option, try the North Spore Monotub, designed to make the cultivation process easier and more efficient.
- Cutting Slits in the Bag: Use a clean knife or scissors to cut 2-3 small slits or ‘X’ shapes in the bag. This is where the mushrooms will grow out.
- Place the Bag in the Fruiting Chamber: Position the bag so that the slits are exposed to the high humidity environment. Maintain 85-95% humidity by misting daily or using a humidifier.
- Light and Air Exchange: Indirect light for about 12 hours per day encourages fruiting. A window or simple LED light will work. Make sure there’s some airflow to prevent CO2 buildup, which can deform mushrooms.
Common Mistake: Inadequate humidity can cause the mushrooms to dry out and form tough, small fruits. Keep the environment moist but avoid direct water on the mushrooms themselves.
8. When and How to Harvest
Harvesting Lion’s Mane mushrooms at the right time ensures the best flavor and texture. Here’s what you need to know:
- When to Harvest: Look for fully formed teeth (spines) that are still white and firm. If they start to turn yellow or brown, they are overripe and may taste bitter.
- How to Harvest: Use a sharp, clean knife to cut the mushroom at its base, close to the bag. Avoid pulling or twisting the mushroom, as this can damage the remaining mycelium and reduce future yields.
- Prepare for a Second Flush: After harvesting, allow the substrate block to rest in the humid environment for a few weeks. Often, a second round of mushrooms will grow.
Pro Tip: Harvesting slightly before the teeth elongate too much results in a milder, more tender flavor, perfect for culinary uses.
Growing Lion’s Mane Mushrooms on Logs: A Step-by-Step Guide
Lion’s Mane mushrooms (Hericium erinaceus) are known for their distinctive shaggy appearance and potential cognitive health benefits. Growing them on logs is a rewarding method that allows the mycelium to flourish in a natural setting. Although this method takes time, the patience pays off with multiple harvests over several years. Here’s a complete guide to growing Lion’s Mane mushrooms on logs, including timelines for each step.
1. Preparing Supplies and Choosing the Right Logs
Before starting, gather the necessary supplies and select suitable logs. The process can take a few days to a few weeks, depending on when you can access fresh logs and source your supplies.
- Lion's Mane Outdoor Log Growing Kit: You can also purchase a full kit like the North Spores Log Growing Kit which includes a drill bit, log sealing wax and 100 ct plug spawn for only $30.
- Lion’s Mane Plug Spawn: These are small dowels inoculated with mycelium, which you’ll insert into the logs. You can purchase plug spawn from online suppliers like North Spore.
- Logs: Freshly cut hardwood logs are best for Lion’s Mane mushrooms. Aim for oak, beech, or maple, which retain moisture well.
- Inoculation Tools:
- Drill with 5/16-inch Drill Bit: For making holes in the logs.
- Wax: For sealing inoculation points and preventing moisture loss.
- Hammer or Rubber Mallet: To tap the plugs into the drilled holes.
Log Selection Timeline:
- Cutting the Logs: Logs should be cut from live hardwood trees 2-6 weeks before inoculation. This ensures they retain the moisture needed for successful colonization.
- Log Size: Ideal logs are 3-4 feet long and 4-8 inches in diameter. This size balances ease of handling with plenty of space for mycelium growth.
Tip: Winter or early spring is the best time to cut logs. During this time, trees have more moisture, which helps the mycelium colonize faster.
|
BEST WOOD SPECIES* |
Beech, Hornbeam, Hard Maple |
|
OTHER APPROPRIATE SPECIES |
Oak, Soft Maple, Sweetgum, Alder, Aspen, Birch, Black Walnut, Box Elder, Cherry, Chestnut, Cottonwood, Elm, Hackberry, Mulberry, |
|
AVOID |
Pine, Hemlock or other similar species |
2. Inoculating the Logs
Inoculation involves introducing the mycelium to the logs, giving it the start it needs to colonize. This process typically takes 1-2 hours per log, depending on your experience and the number of logs you are preparing.
- Drilling Holes:
- Use a 5/16-inch drill bit to drill holes spaced 4-6 inches apart in a diamond pattern along the log. Each hole should be about 1-1.5 inches deep.
- A standard 3-foot log will need around 30-40 holes, providing enough space for the mycelium to spread throughout the wood.
- Inserting Plug Spawn:
- Place a Lion’s Mane plug spawn into each hole. Gently tap them in with a hammer or rubber mallet until they are flush with the surface.
- Make sure the plugs are snug in the holes to ensure good contact between the spawn and the wood.
- Sealing with Wax:
- Melt tree wax and apply it over each hole with a brush or applicator.
- This step takes 30-60 minutes, depending on the number of logs. It prevents the plugs from drying out and protects them from contaminants.
- Consider waxing the cut ends of the logs to help retain moisture throughout the colonization period!
Common Mistake: Forgetting to seal the inoculation points can lead to drying out, which significantly delays colonization. Always ensure the holes are properly waxed.
3. Placing the Inoculated Logs for Incubation
After inoculating your logs, it’s time to set them up for incubation. This period allows the mycelium to spread throughout the log, transforming the wood into a nutrient-rich environment. Incubation lasts between 6 to 18 months, depending on the wood type and local climate.
- Location Selection:
- Choose a shady, moist area outdoors, such as under a tree canopy or beside a building that provides consistent shade.
- Place the logs off the ground using bricks, pallets, or other logs. This prevents contamination from soil-borne fungi and keeps the logs from drying out too quickly.
- Stacking Methods:
- Lean-To Stack: Propping the logs against each other in a lean-to style allows good air circulation.
- Log Cabin Stack: Crisscrossing logs in a log cabin style also works well, keeping them stable and well-ventilated.
Incubation Tip: During dry spells, water the logs to maintain moisture levels. Use a garden hose to spray them down or soak them for a few hours if conditions become very dry.
Common Mistake: Neglecting the logs during the incubation period can cause them to dry out, slowing mycelium growth. Regularly check the moisture level, especially in summer.
4. Incubating the Logs
During the incubation phase, the mycelium grows and spreads throughout the logs, digesting the wood and preparing it for mushroom production. This period requires patience and monitoring.
- Timeline: Expect 6 to 18 months for full colonization, with variations depending on the type of wood and the local climate.
- Signs of Mycelium Growth:
- You may notice white mycelium forming near the plug sites or under the bark. This is a good indicator that the mycelium is spreading.
- Don’t worry if progress seems slow at first; much of the activity is happening inside the log, where the mycelium is breaking down the wood’s fibers.
Fun Fact: During colonization, the mycelium breaks down lignin and cellulose in the wood, turning it into a nutrient-rich environment for mushroom growth. It’s nature’s way of recycling!
Moisture Maintenance: Keep the logs moist during this period, especially if you experience hot or dry weather. A lack of moisture can cause the mycelium to stall or even die back.
5. How to Tell if Logs Are Fully Colonized
Knowing when your logs are ready for fruiting is key to achieving a successful harvest.
- Signs of Full Colonization:
- White Mycelium Under the Bark: Peel back a small section of bark to check for a white, fuzzy layer. This means the mycelium has thoroughly spread.
- Firm Feel: Gently tap the logs with a hammer. A solid, dense sound indicates that the wood is well-colonized.
- Patience Pays Off: It’s tempting to try to force fruiting early, but allowing the mycelium to fully colonize results in stronger and more productive mushroom growth.
Timeline Tip: Logs inoculated in spring may be ready to fruit by the following fall or the next spring, depending on weather conditions and wood type.
6. Encouraging Fruiting and Harvesting Lion’s Mane
Once your logs are fully colonized, they can begin fruiting when conditions are right—typically in fall or spring, when temperatures and humidity levels are favorable.
- Soaking the Logs:
- To trigger fruiting, soak the logs in water for 24 hours. Submerge them in a tub or pond to rehydrate the wood and simulate a natural rain event.
- This soaking helps to wake up the mycelium and signal that it’s time to produce mushrooms.
- Placing in Fruiting Conditions:
- After soaking, set the logs upright or horizontally in a humid, shady area. Maintain 85-95% humidity around the logs by misting them regularly.
- A garden sprinkler or daily misting with a hose can help maintain the necessary moisture levels.
- Mushroom Growth Timeline:
- After soaking, you may see small white bumps (pins) forming within 1-2 weeks. These pins will grow into the shaggy clusters characteristic of Lion’s Mane.
- The mushrooms will mature over 7-14 days, depending on the temperature and humidity.
Harvesting:
- Timing: Harvest the mushrooms when their spines are fully formed but still white and firm. If they begin to yellow or turn brown, they may become bitter.
- Technique: Use a clean knife to cut the mushroom at the base, close to the log. Avoid pulling or twisting, as this can damage the mycelium beneath the bark.
Pro Tip: Logs can produce mushrooms for 3-5 years, with multiple fruiting cycles each year if properly maintained. After each harvest, keep the logs in a humid environment to encourage future flushes.
7. Common Issues and Solutions
Growing Lion’s Mane on logs is a long-term investment that can come with challenges. Here are some common issues and how to address them:
- Competing Fungi: Other fungi may start to grow on the logs if conditions aren’t ideal. Keep logs elevated and in a clean, shaded area to minimize competition.
- Slow Growth: If mycelium growth is slow, it might be due to low moisture or cold temperatures. Soak the logs or move them to a warmer, more humid location to help.
- Mushrooms Drying Out: If the mushrooms dry out before fully maturing, increase the humidity around the logs by misting them daily.
How to Store Lion’s Mane Mushrooms
After successfully harvesting your Lion’s Mane mushrooms, proper storage is essential to preserve their freshness and maximize their shelf life. Here are some tips for storing your harvest:
- Refrigeration: Fresh Lion’s Mane mushrooms should be stored in a paper bag in the refrigerator. The paper bag helps absorb excess moisture, preventing the mushrooms from becoming slimy. Stored this way, they will keep fresh for up to a week.
- Freezing: For longer storage, Lion’s Mane mushrooms can be sliced and frozen in an airtight container or zip-top bag. While freezing may alter their texture slightly, it preserves their flavor and nutrients for up to 3 months.
- Dehydration: Dehydrating is another great option if you want to store your mushrooms for even longer. Use a food dehydrator or oven set to a low temperature. Once fully dried, store the mushrooms in an airtight container in a cool, dark place, and they’ll last for up to a year.
Fresh vs. Dried Lion’s Mane Mushrooms
When deciding how to use or store your harvest, it’s important to consider the differences between fresh and dried Lion’s Mane mushrooms:
- Fresh Lion’s Mane: Fresh mushrooms have a delicate texture and a mild, seafood-like flavor. They are perfect for sautéing, adding to soups, or even grilling. Fresh Lion’s Mane can also be blended into smoothies or used in recipes that call for meaty, tender ingredients.
- Dried Lion’s Mane: Dried mushrooms are more concentrated in flavor and can be rehydrated before cooking. Rehydrated Lion’s Mane is great in broths, stews, or teas, where it can absorb flavors. Dried mushrooms are also ideal for making powders or extracts, which can be added to coffee, smoothies, or used as a supplement.
Pro Tip: Rehydrating dried Lion’s Mane is simple—just soak them in warm water for about 20-30 minutes until they regain their original texture.
Dive Deeper into Mushroom Cultivation
Growing Lion’s Mane mushrooms, whether using the bag method or on logs, is a fulfilling way to explore the world of mushroom cultivation. With the right care and patience, you can enjoy fresh, home-grown Lion’s Mane that brings both flavor and potential health benefits to your kitchen. Once you’ve mastered the basics of growing, there’s a whole world of mushroom-related projects to explore.
- How to Make a Lion’s Mane Tincture: Learn the step-by-step process of creating a potent Lion’s Mane tincture, perfect for harnessing the mushroom’s cognitive benefits.
- Lion’s Mane Tea Recipe: Discover a simple and soothing tea recipe using dried Lion’s Mane to enjoy its earthy flavor and potential health-boosting properties.
- More How-to-Grow Guides: Explore our detailed guides on cultivating other mushroom varieties like Shiitake, Reishi, and Oyster mushrooms, perfect for expanding your home mushroom farm.
- Free Downloadable Mushroom Growing Book: Get your hands on our free, downloadable book that covers everything from beginner tips to advanced techniques in mushroom cultivation.
These resources will help you make the most of your Lion’s Mane harvest and continue your journey into the fascinating world of fungi. Happy growing, and enjoy your harvest!